|
Home Updates Hydros Cars Engines Contacts Links Contact On The Wire Manufacturers |
The Experimental and Model Co.
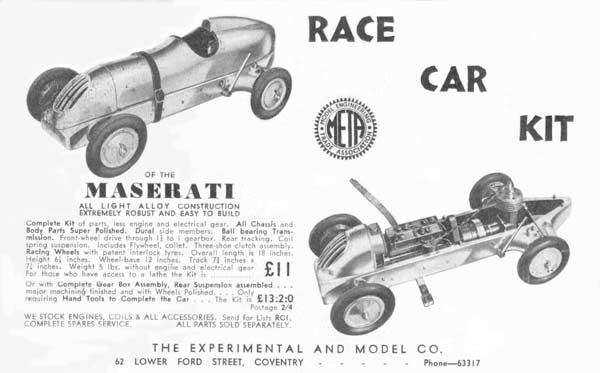
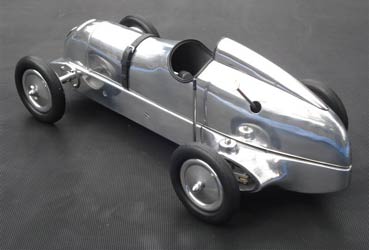
Advert that appeared in 'Model Cars' September 1948.
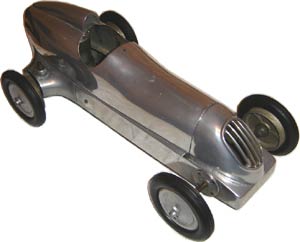
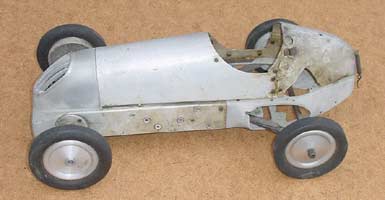
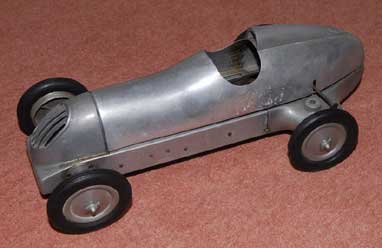
The E&M car was considered to be something of a rarity at one stage but recently a number have come onto the market which has depressed values significantly. Below are some of the examples that have been offered for sale.
|
|
|
|
| 2004 Christie's sale: £4230 | 'Antiques Road Show' £1350 in 2008 |
£1500 in 2008 for this example. |
|
|
|
| A private collector owned both these cars but decided to sell one on. The 'wreck' is now undergoing serious surgery. | |
|
|
|
| Serious sheet metalwork in progress to build a new body. | 2008 Just £880 for a complete and original car. A fickle market? |
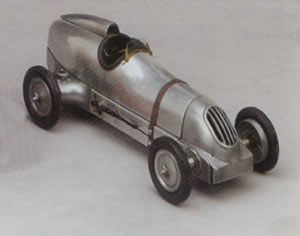
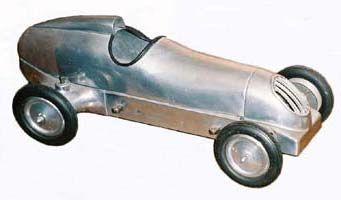
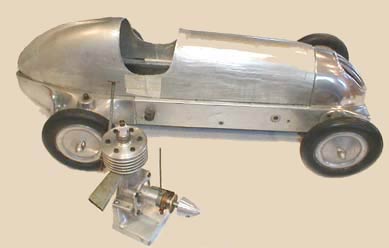
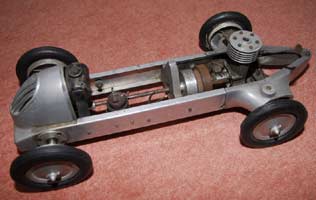
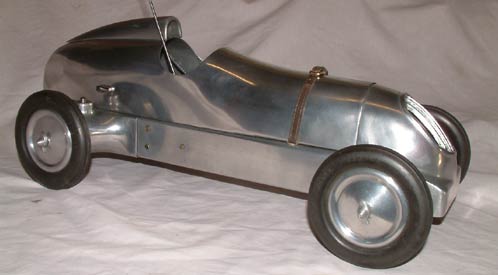
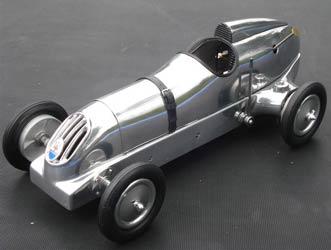
Little is known about the Experimental & Model Company other than its address in Coventry and that the man behind the venture was a Mr. Knowles. Only one car was ever produced by E&M, the Maserati illustrated here, which was launched onto the market in 1947. The car was sold in kit form, and with the exception of the Stentor engine and ignition components, everything else was produced specifically for this model. The car was advertised through to the autumn of 1948 but then nothing more is heard of E&M until 1954 when the 'Model Maker' carried an article about wheels and tyres being available from them. These were the same as were offered with the kits, so may well have been surplus stock from the original production. The great mystery remains though as to which Maserati was the prototype for this model?
Recently, information has come to
light that the E&M shop in Lower Ford Street Coventry continued to operate
for many years moving into slot cars, and RC cars, kits and more. When the
shop eventually closed, a large quantity of cars and parts were passed on by
the Knowles family to members of the re-emerging tethered car community in
the UK/
|
|
|
|
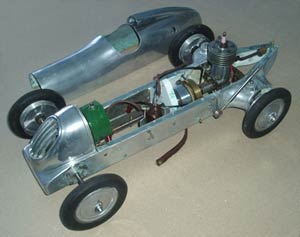
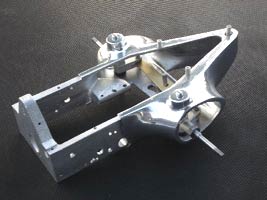
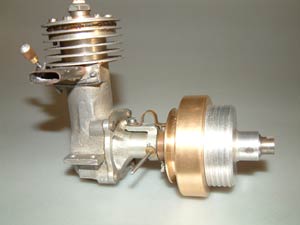
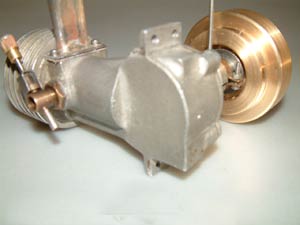
| Front wheel drive, bevel gearbox. | Front and rear castings and aluminium channel. | Clutch and 'supercharger bracket'. |
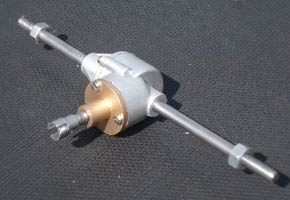
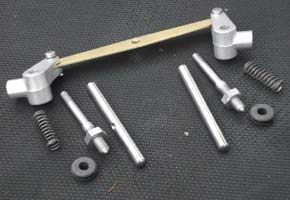
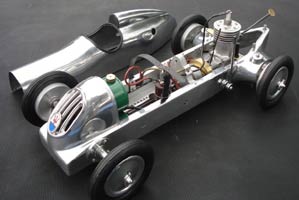
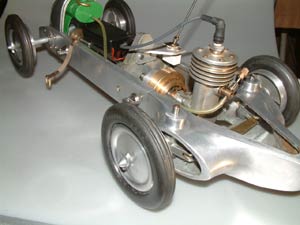
The front end of the car is
held together by two bearing carriers which clamp the side members to the front
casting. The gearbox has a bronze bearing on the input shaft but the front axle
runs in the aluminium casting. Only the solid coupling holds the gearbox in
place.
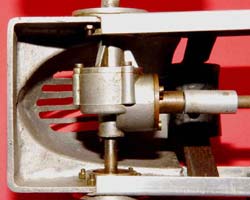
The drive from the three-shoe centrifugal clutch goes through a fixed bearing
directly to the gearbox. With the engine mounted rigidly in the rear casting and
the gearbox in the front casting, getting the driveshaft to line up and rotate
freely is a nightmare. The original plan gives the option of a universal joint
between the gearbox and the driveshaft, but as this would then allow the gearbox
to rotate on the axle it is a far from satisfactory piece of design.
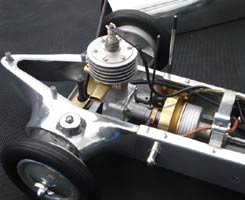
At the front of the rear casting is what was grandly termed a 'supercharger
bracket'. One assumes that the supercharger would be driven from the flywheel by
a rubber wheel as seen on some early American cars. Quite how this would be
connected to the venturi which is on the back of a 'Stentor' one can only guess
at.
While most of the examples above have the 'Stentor' fitted, the 'Road Show' car
has a 'Mechanair' and one turned up on eBay with an ETA 5R diesel. The 'wreck'
had an extensively modified Westbury 'Ensign' roughly lodged inside it which
could never have worked. The E&M clutch is designed specifically for the
'Stentor' with a precisely machined collet that tightens onto the crankshaft so
that the flywheel does not clamp against the brass prop-driver which also serves
as the contact breaker cam on that particular motor.
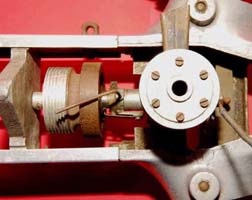
The front axle is mounted rigidly but the rear axles are sprung mounted on the
two pillars that can be seen by either side of the engine. The axle mounts can
rotate on these pillars and are connected to each other across the car with a
plate that is used to adjust the steering of the rear wheels. An adjuster slides
in a slot in the rear casting and is tightened to lock the wheels for the
desired circle the car is going to be run on. A pack of thin NIFE
cells sit in a carrier to the right of the driveshaft with the coil and
condenser in clamps on the left and a fuel tank sits just behind the front
radiator casting. The 3.75 x 5/8th solid tyres that cost just 2/- (10p) in 1954
were mounted on two-piece cast aluminium hubs, most of which had false finned
brake drums on the inner half.
The kit was available fully machined and ready to assemble with hand tools for £13-2-0, but if you had a lathe and workshop facilities the kit was just £11. Quite how much work and machining was required for this option was never revealed. All parts were also available separately.
Thanks go to Gary Maslin, James Rowley Hill, Chris Cole, Alan Whitehead, and Ron Reiter for information and photo's
A 'Maserati' on the 'Workbench'
Above are photographs of cars that have come onto the market in the last few years. Condition ranges from 'Wreck' to polished within an inch of its life. One of the great dilemmas, whether dealing with models, or full sized items, is how much restoration is appropriate. At either ends of the scale, there is no problem. Faced with a true 'basket case' then a complete restoration and rebuild is appropriate. At the other extreme, the condition may be so good, that nothing more than a gentle clean is required. Any other action is a compromise, dictated by what you are faced with, and how you view the conflicting aims of preservation/conservation and rebuilding/restoration. The car featured below was bought back in March 2008, and was a prime example of the restoration 'dilemma'. The car was complete and running, yet not entirely original. Gary Maslin has kindly sent details of how he has tackled the car, and some of his reasoning. As usual, it is a credit to his standards of workmanship and desire to maintain' originality' as far as is practicable. Happily, it also provides an ideal opportunity to see the unusual construction of the car.
|
Although plans exist for the Maserati, they lack much of the detail required, so that there is no 'definitive' standard to work to, and as most were 'home built' there are many variations on the theme. The obviously 'non original' parts on Gary's car were the clutch and gearbox, and luckily a fellow member of the Retro Club was able to provide the correct gearbox and axle to get him on his way. Gary has also invested in a bead blaster, to ease the 'cleaning up' process. Incidentally, cat litter works very well and is not at all aggressive in one of these devices. |
|
The basis of the car is two complex castings, held apart by two aluminium channels. In the rear casting is the steering and rear suspension , as well as the motor and clutch which have to line up exactly with a bearing in the 'hump backed supercharger mount. Inevitable 'home builders' tend to drill holes with a degree of 'abandon' which can leave the castings unsightly. This is where decisions have to be made about what to replace, what to tidy up and what to leave. All the existing parts were given a good clean and polish, but the side rails were so 'peppered' with holes that a new pair were folded up. The drawing gives a rough idea of the shape of the tank, but no more, so a new one was made to match what was in the car, along with a mounting system that could pick up on existing holes.
 |
 |
 |
| Steering, suspension and stub axles | Rear casting and axles | New fuel tank |
The worst job by far is getting the
drive train to line up. The front axle is mounted solidly, the drive shaft
has no universal joint and has to slide exactly through the bearing in the
supercharger bracket and into the clutch. Getting this right can try the
patience of even the most placid of us and even Gary had several 'moments'
getting the front casting to match up satisfactorily with the side rails.
 |
 |
 |
| Stentor and clutch bolted in rear casting | Gearbox and driveshaft fitted | Sub frame for tank and ignition. |
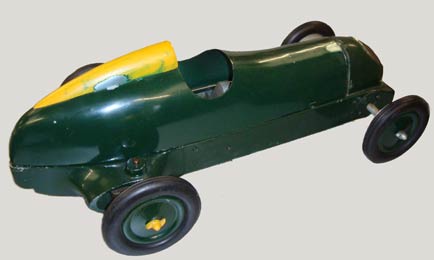
With no guidance as to fuel and ignition 'runs', it was down to the individual preference, and here Gary has come up with very neat solutions, using 'period' materials and cable clips. Although Maseratis are predominantly Red, most of the E&M versions stuck with the natural aluminium finish as supplied, or polished if sufficiently enthusiastic. This car had been painted at some stage, but stripped before it was offered for sale, and so the 'polished' option was the one chosen. Being a semi scale car, many had extra trim fitted, or even dummy exhausts. Gary has stuck with a very tasty grill badge, and cockpit padding, just to 'lift' the appearance.
 |
 |
With one of his fast diminishing stock of watch straps, to hold the body shell in place, Gary has completed a very sympathetic restoration of what is turning out to be a much more common commercial car than was first thought. With no real history to the car, and much of the 'modification' work less than 20 years old, this E&M represents one person's approach to the 'vexed' question of 'how much to do'?
 |
 |
Thanks to Gary Maslin for all the photographs and details of this superb restoration.
John Goodall restores another example
|
|
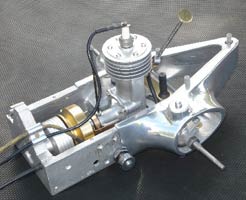
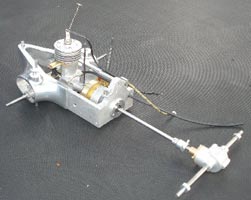
I have just finished my E&M Maserati which when I bought it some years ago was painted in British Racing Green. I had to remove the paint as it got burnt when doing some weld repairs to unnecessary cut outs and more was needed when the paint was removed, as a hole and a few dents emerged at the rear end. These were removed as best I could and polished out and I decided after all the hard work I would leave it polished. I have fitted a Stentor 6 Mk1, which might be a prototype? I say this because I used to make castings for the Stentor 6 and got to know more about them than most, making a batch of 25 with the help of Arne Hende who at the time lived in Stockholm, Sweden. I sold the castings with a build series in Model Engine World for some years. |
This engine is unique with no Stentor 6 legend cast in like all other Stentors I have had through my hands, and that is a lot. The transfer passage is slightly smaller and more rounded than other Mk1 engines and then there are cast in features in the crank case again not appearing on any other Stentor I have seen, which is why I believe it is a prototype as it is clearly a Stentor 6! The engine needed a flywheel and clutch, which I made using modern clutch shoes obtained from the internet. I bushed the alloy clutch housing with a steel liner pressed in.
 |
 |
 |
| Unusual Stentor motor | No cast in name | Modern commercial clutch components |
 |
 |
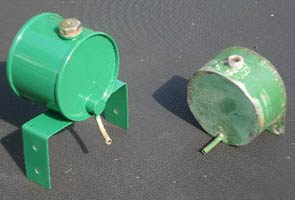
| Battery compartment | Fuel tank in nose |
|
|
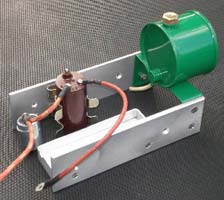
I had to repair the rear track rod because although the car had never been assembled with an engine and drive system, the clearance was excessive with wobble in the wheels, so I bushed it and silver soldered the bush giving more bearing area. I made and fitted the tether points in stainless steel and renovated a period 'Colman’s Mustard' tin tank, made a battery box with four 3 volt camera batteries giving 3000Ma and fitted the coil ignition all mounted on an alloy platform using existing holes as far as possible and now it should run, with a cut off switch in the cockpit. I think it has taken seven or eight weeks from when I started last year?? The bonnet strap is from one of my wife’s cast off wrist watches? |
©copyrightOTW/JohnGoodall2008/09/19