|
Home Updates Hydros Cars Engines Contacts Links Contact On The Wire |
Work Bench
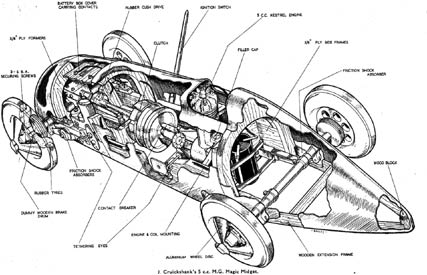
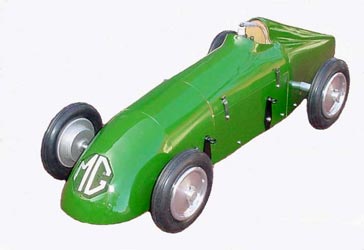
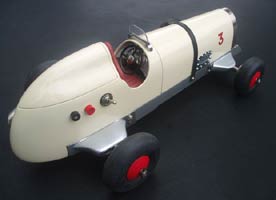
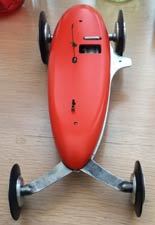
The Cruickshank Designed MG Magic Midget
Building A Pioneer
As outlined on the History page, there was no commercial activity involved with tether cars in the UK until after the end of the Second War, although there were published designs. The only way to realise these though was to make all the parts yourself. Having recreated several commercial cars using original parts I decided to have a go at one of the original seven ‘Pioneer’ cars from the Drysdale Press plans. The decision on which model to chose was made when Peter Hill of the Retro Racing Club found me an original plan for the Cruickshank MG.
|
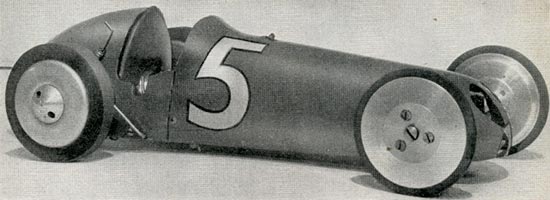
The model was based on a full sized racing car, the MG Magic Midget, EX 127. There is a deal of confusion over the MG record-breaking cars however. There were two quite distinct cars built and developed from 1930 onward. The more famous was the streamlined record breaker EX 135, which was based on the 6 cylinder Magnette chassis and is closely associated with Goldie Gardner. This was the car modelled and raced so successfully by Jack and Lucy Gascoigne and Ian Moore. The other car used the smaller 4 cylinder Midget chassis as a base and was originally built in 1931 to be raced by George Eyston. It was the smaller car that Cruickshank’s design was to represent. The design as originally published bears only a passing resemblance to the prototype, which was a very small car with a simple, almost slab sided body. |
|
Cruickshank specified a much more streamlined and less angular shape, more reminiscent of the large Brooklands cars. It gave the model the proportions of a much larger prototype.
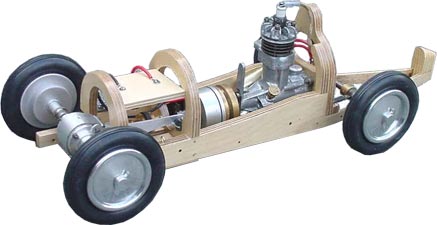
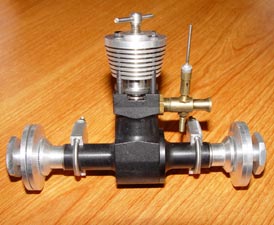
Armed with the plan, a supply of 9mm plywood and a band saw, the chassis was no problem at all but there it sat on the shelf to taunt me for several months. Every time I looked at the chassis I had doubts. Could I get a suitable Kestrel with the correct radial finned head? The worm drive gearbox also looked very suspect and there seemed to be no sensible or robust way to install the engine mount. The suspension looked a bit iffy as well.
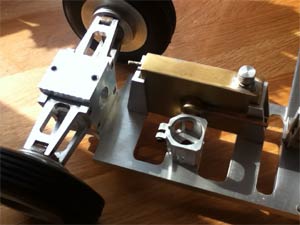
Just could not see my way to continuing with the car until I had resolved these issues. In the course of looking for information on a particular hydroplane, Peter Hill discovered that in Model Engineers during December 1944 Cruickshank had described a MKII version of the car. The worm drive gearbox had been abandoned as it had self-destructed in short order. He had also got rid of the separate engine mount and bolted the motor straight on to the chassis former, altering the suspension to suit. Cruickshank obviously had the same reservations as I did.
|
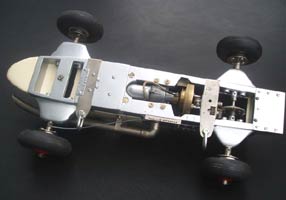
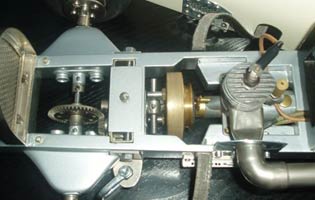
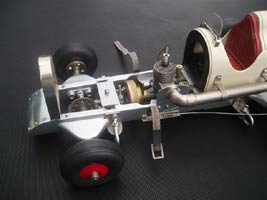
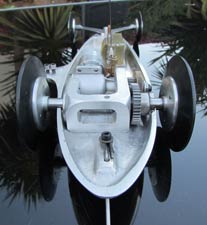
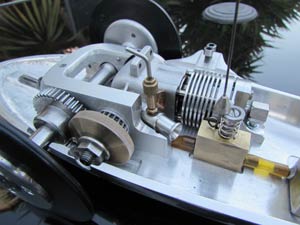
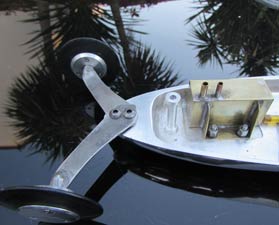
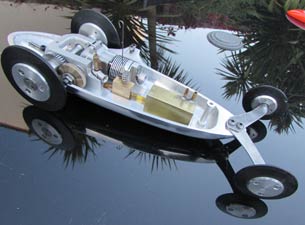
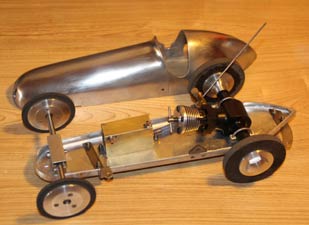
It was another 5 months before I obtained the relevant magazines and then I was away. One new solid former replacing the suspect two in the existing chassis, and there was a built in engine mount for the correct Kestrel, found on eBay. The spares box provided a bevel gearbox almost identical to the drawing and enough clutch pieces to create a useable unit. 1066 long flywheel collets fit a Kestrel perfectly, not just a happy coincidence methinks. The cush drive was not necessary, but it looked so good that I made up one of those as well. I did divert from the plan as I went for a live rear axle to simplify the wheel design. Leaf springs and axle bushes quickly followed and there was a complete chassis. |
|
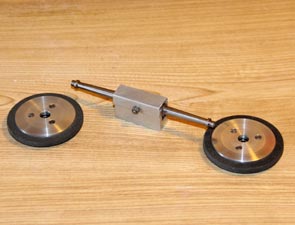
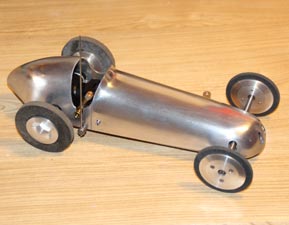
Wooden wheels were retained, but with 1066 type tyres from Bill Bannister instead of rubber rings which were standard at the time. Four very tasty hand made (and handed) ‘knock off’ spinners hold aluminium covers on to the wheels as per plan. Battery box and switch made exactly as the drawing and there was a presentable car.
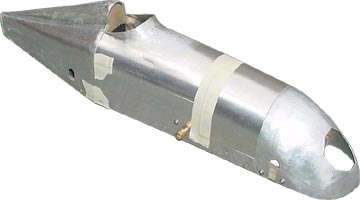
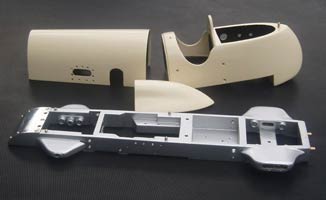
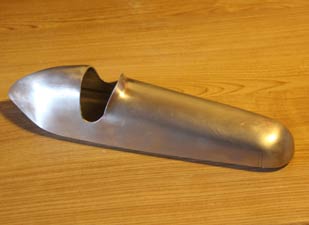
Only a body to build. Aaagh, the worst bit of all. How I love tin bashing, or aluminium in this case. Firstly I had to decide whether to go with the streamlined shape, or the more scale like one with the slab sided built up tail. Having seen the superb version built by the late Dave Moir I decided to go for the longer one-piece tail with the extra work and swearing involved. 24 swg was the thickness of sheet specified and luckily this was available from B&Q so there was no room for any excuses. My wife staggered home from school with a bag of stakes and a dinging hammer that I had ‘borrowed’ and I spent a happy week cutting, annealing, bashing and planishing.
On of the most useful bits of equipment I have is a Mini Folder, designed by Mike Broadbent of Aviation Modeller. Sheet metalwork is a lot easier with this tool, check it out. Fuel tanks are a cinch.
|
|
For the sheet metal virgins there are two ways of creating a 3D shape. Sinking, which involves bashing the metal into a bag or block, and raising that stretches the material either with a hammer or an ‘English Wheel’. This is a much more subtle process and the one specified by Cruickshank for the nose of the car. Mind you, I can now agree with Ian Moore about it being ‘an anti-social way of making a body’. I still have ringing in the ears. Either I must be learning, or had a bit of luck as the resulting panels fitted better than I ever dared hope. A trial fit showed need for a little ‘gentle persuasion’ on the cockpit cover and that was all. |
At this stage I cut and drilled all the holes that would be needed before the rubbing down and painting process began. 24 swg is thin and great care was needed when handling the formed nose, especially marking and cutting out the octagon.
|
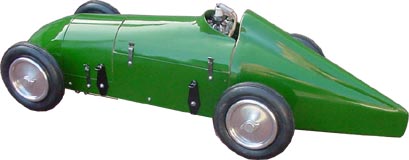
I was amazed that after a rub down with 400 wet and dry and a spray with etching primer only the headrest needed any filling. Another coat of primer and frightening it with 1000 w&d and it was topcoat time. The original car had a variety of colour schemes in its life but Cruickshank had used British Racing Green, so that was the colour that went on. |
|
One coat all over and it looked super, until a rogue gust flipped a piece of paper on to the wet surface of one panel, so that had to come back to the bare metal. The radiator mesh and logo looked to be difficult, and so it proved.
|
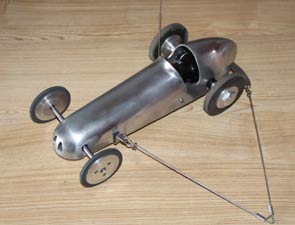
Cutting the letters was easy enough, but getting the mesh to the double curve and then getting the letters on was a very frustrating process. Eventually I got there and all that was left was 6 very fiddly body clips to be made from a watch spring. Suddenly the car was finished, well almost as Cruickshank had specified a wooden penholder as the stalk on the knock off switch. Could I find one, just to be ridiculous? The copy shop supplied a beech mapping penholder and I had a completed Cruickshank MG Magic Midget. Completed Cruickshank MG Magic Midget |
|
Dave Cunliffe
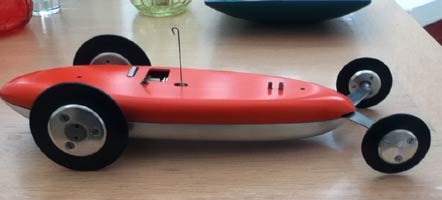
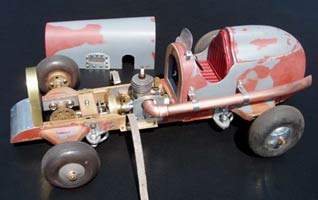
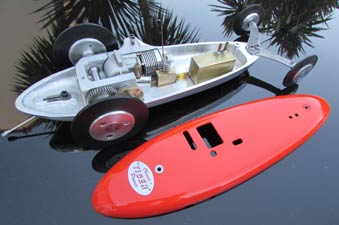
From 1950 through to the end of tethered car racing in this country, and for even longer abroad, the Oliver motor reigned supreme in both the 2.5cc and 1.5cc classes, initially with the MkI and MkII twinshaft motors. When the state of tune of these direct drive engines dictated ever smaller tyres, competitors moved over to the single ended motor geared to the drive axle so that larger tyres and different gear ratios could be used. Apart from a couple of experiments with bevel drive, virtually all were spur driven in either cast or beaten pans, almost reverting to the original concept of Harry Howlett's Alfa Romeo. This style of car, along with the Oliver motors, was used by Jack Cook, Ken Procter, Roland Salomon and many others, to great effect and several versions were described in Model Maker in the 1950s. This lovely replica is based on Ken Procter's Beretta Rosso (Red Top) featured in a 1957 edition.
 |
 |
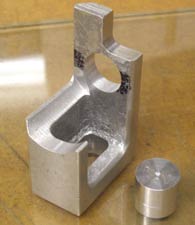 |
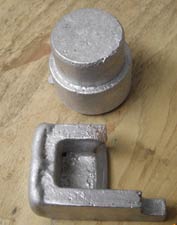
| Pan and engine mount patterns | Raw castings | Machined mount |
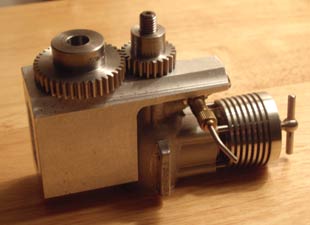
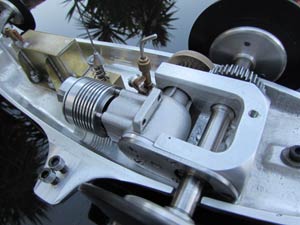
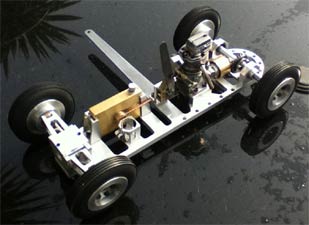
Dave regularly casts up pans and parts for his builds and with no commercial castings available for this type of car, this is the route he took, starting with making the patterns for the pan and engine mount. It is the mount for this car that is the most interesting as Dave explains: 'As with the original, the idea is to reduce the cross sectional area but the original motor had its mounting lugs cut off.......!' It became customary to take a hacksaw to the lugs of motor in the 1950s, whether Olivers, Doolings or anything else, not a consideration 60 years ago, but hardly appropriate now, given market values.
Rather than an original Oliver, the motor Dave chose was
one of Tom Ridley's modern production items, but again as Dave points out:
'I wasn't about to start doing that to a new motor so
slots in the pan and body were cut to accommodate them. I don't think it
detracts from the appearance of the car.'
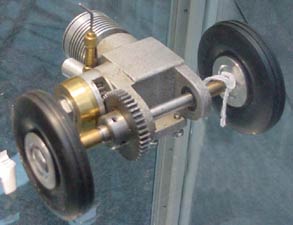
Various methods of mounting motors were tried, even as far as the
prototype unit seen below with the mount and bearing housings part of the
crankcase casting. The method Dave used was to locate the motor on the front
bearing housing and hold it in place with a plug in the rear crankcase cover
as seen below.
|
|
 |
|
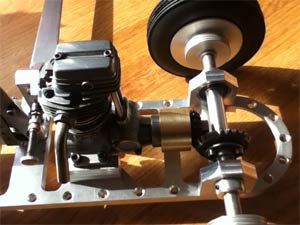
| Checking the mesh of gears | Prototype Oliver | Lugless mounting system |
 |
 |
 |
|
'The cylinder head is
also one I made as, again, I didn't want to cut up my Ridley
motor. The original had its |
||
 |
 |
 |
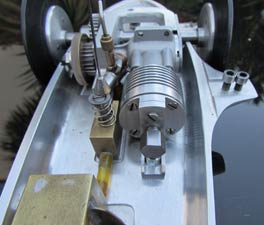
| Tight fit all round, Oliver style fuel cut-off | Spring steel front axles, body mount, tank | |
 |
 |
 |
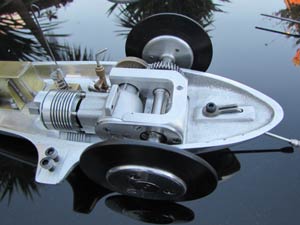
| Superbly built replica of a
car seen on tracks throughout Britain and Europe in the mid
to late 1950s Thanks to Dave for sharing the details of this car and the wonderful photos. |
||
Retro four-stroke
Several Retro Club members have gone down the route of using four-stroke motors, the late John Scott with his ERA, Steve Betney with his Toschi Ferrari and Hugh Blowers with an M&E based vintage racer. Dave Cunliffe has carried on in this vein with this FS 40-powered ‘special’. The superbly engineered front suspension coupled with the generous proportions of the car should ensure a very smooth run. Dave explains progress so far below.
 |
 |
 |
I only have a few pics at the
moment as it has been a long slow build, with bits going in a box as they were
made (in between other cars). The chassis was just a slab of half inch thick
alloy which cost the grand sum of £5. Then, it was chopped out - I guess 70% of
the original weight has gone. Likewise, the engine mounts and rear axle bearing
mounts are hollowed out. The fuel cut off was one of the first tether car bits I
made so is at least 20 years old.
I only really need to make a couple of coil over shocks to fit the unequal
length wishbones and then the body to finish it.
The Galeota Beginner's Car
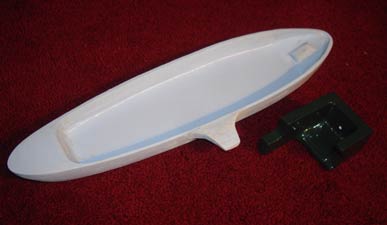
Retro Club member Gary Maslin set himself the task of building replicas of each of the seven 'pioneer' tethered cars that were responsible for starting this sport in Britain. He has now completed the first of these, which was also the first design to be published commercially. It represents the true beginning of tethered cars.
With the outbreak of the Second World War, aero-modellers were faced with a total ban on flying petrol engined model aircraft. In September 1942, by way of relief for those frustrated folk with their grounded craft and idle engines, the editor of ‘Aeromodeller’ Douglas Russell, published the plans for a simple, direct drive, petrol engined tethered car. Designed by A. Galeota, the car was named the 'A G midget model race car' and it's power source was a 2.5cc 'Spitfire' motor, manufactured for Model Aircraft Stores of Bournemouth by Rodgers and Geary of Leicester, better known for the Stentor.
With hardly any commercial activity-taking place in the model market, it was a case of making what you wanted or utilising what was to hand, and the Galeota was ideally suited for the times. The 18 ½ inch long car had a chassis of hardwood with reinforcements and cross members glued and screwed. The body of five wooden formers covered with thin plywood could also be easily made.
Intended for the 'amateur' who didn’t have the use of a lathe, the only other thing the constructor needed , apart from the engine and flywheel, was a Meccano set. The direct drive was through a spur reduction gearbox to a set of Meccano 3:1 brass bevel gears for the final drive. The driving axle ran in plain bushes (Meccano double-arm cranks) screwed to the insides of the side members. No clutch was fitted, and all the gears were run in the open. The driving seat and back were balsa covered in red rexine with the coil and condenser under the seat. Dummy instruments on the dashboard, a Meccano steering wheel and the wind shield cut to shape from the celluloid of a pocket watch. The switch and sockets on the tail are for a booster battery for the ignition.
|
|
|
|
In conjunction with this plan, the Aeromodeller launched a competition for the 'Two fastest tethered runs achieved by model race cars'. One of the rules was they had be replicas of full-sized racing cars or bear a distinct resemblance to a full sized machine. Divided into two classes, 6cc and 10cc, the real incentive was the ten guineas offered for the fastest times over a 10-lap circuit for each class. It was a considerable sum in those days and over two hundred people sent for copies of the full sized plans of the "AG" Midget Car. At two shillings each this hardly covered the prize money offered.
In the October Aeromodeller, D A Russell wrote reminding reader's about the competition, and that 'It is essential that a flywheel be fitted" to the car, so they must have had several queries on this subject Also an additional rule had been added which stated that all model cars entered, must be insured under the new NGA (National Guild of Aeromodellists) scheme at a cost of two shillings and sixpence. Negotiated with Lloyds Underwriters, it offered £5,000 third party insurance, available through the magazine.
|
|
|
|
In the same article Mr Russell devoted a
further two pages to calculations, proving
that by correctly designing and building a model car that theoretically, speeds
nearer to the American claim of over 100mph could be obtained.
Mr Galeota had claimed a more modest speed of 20mph for the Galeota. In 1947 ‘Model Cars’ carried a report of
a Galeota built by Mr L Manwaring that had had slight modifications to its
bodywork. Powered by a 3.5cc Atlas engine it had achieved a speed of 20-25mph.
However it went on to state that ‘when minor problems with the switch contacts
etc are ironed out’ it would be quicker.
|
The winner of the 5cc class was Jim Cruickshank with the first version of his Kestrel engined M G Midget, which achieved 40mph. Gerry Buck running his No. 2 car was first in the 10cc class with a speed of 45mph. The later Buck 2a and the Cruickshank MG joined the list of car plans offered by Drysdale Press another of Mr Russell’s companies. These plans cost fifteen shillings and sixpence, while the plans for the Galeota, now called the 'Galeota Beginners Car', had increased to seven shillings and sixpence. Gary Maslin has made a great job building this car, and tells me the floor is covered in metal shavings as he is now well underway on his next project. Thanks to Gary for sharing the various stages of his work with us and for providing these excellent photo's. |
|
‘Busy’ During the winter
Sometimes, all it requires is one phone call to get a project underway. On this occasion it was with John Goodall, who was going to follow his superb ZN replica body shells with sets for the Oliver’s ‘Busy’. There was only ever one ‘Busy’, originally fitted with a sideport twinshaft Oliver motor and then more famously with the prototype rotary valve twinshaft that became the Tiger. I had been singularly impressed with the performance of Peter Hill’s Jaguar engined Alfa as well, so yes please John, can I have a set. Considering that each of the body and pan sets that John has produced has been beaten, by hand, from aluminium sheet and then presented without a single blemish to the surface represents a huge amount of work and a degree of skill that I can only admire. In my mind, they stand on their own and would be a fine addition to a collection.
The quality of the work is a testament to John’s ability to make sheet metal do what he wants, a skill I lack, almost entirely, and my tinnitus is bad enough as it is. Something else that attracted me to this project, unlike the ZN, was that no commercial components were used in the original, so I was not at the mercy of ebay looking for parts, everything could be made, even the tyres. The only item that had to be sourced was the motor, oh dear? Never seen an original RV and a production Tiger with the flat foot could not be fitted onto the pan. Battleaxes and Nine Ports were way beyond my means and later replicas such as the Dunham and IP impossible to locate, so the last realistic hope was for one of Ian Russell’s Jaguar replicas that would be a direct slot in, if one could be found?
 |
 |
 |
| Beautiful, hand beaten pan and body | Front axle assembly | The elusive Jaguar |
The actual build is probably one of the easiest ever undertaken. The front axle was turned from a lump of metal recycled from a printer, the wheels from the chassis of a photocopier, from whence the bearing also originated and the tyres courtesy of Network Rail. Next on the menu were the tether brackets. The drawing shows the front one coming through the body almost at axle level, while the rear one oddly came through the joint line, neither of which would be easy without slots in the body shell. I am guessing the reason for the different heights of the brackets is that it makes the C of G about right somewhere in the middle.
Not much more than odds and ends to do on the car, until a motor was located, although the knock-off presented an interesting conundrum. In the plan a normal Oliver pattern, spring one, is shown but operated from the original external, pivoted lever. To get it low enough for the RV motor, a hole is punched in the pan to give room for the sprung plunger to drop, not entirely satisfactory, but an earlier rotary one was lurking in the spares box, already radiused to fit in the pan, job done. All beginning to look a bit like a car now although minus the important bit, and here I struggled, nary a twinshaft in sight, which eventually brought the project to a standstill. We now have the odd situation where the demand for Oliver style twinshaft motors has far exceeded availability, indeed this phenomena is apparent with many other tether car items as suppliers and manufacturers have pulled out of the market. It was all getting a bit desperate until club member Steve Betney came up trumps with a lead to a brand new Jaguar that was available.
 |
 |
 |
| Venturi and 'knock off' | Jaguar twinshaft motor | Replica, 70 years on |
Judicious use of a large toolmakers cramp enabled the pan to be jig drilled for the motor mounts and U bolts with the undersides being spot faced to take out the angle created by the upswept tail. Some careful marking out and a selection of files had the cut-outs for the shaft housings fitting perfectly, leaving only another slot to be filed for the venturi, which sticks out from the side of the cockpit. Busy still had this cut out, even when the RV twinshaft was fitted although this had a rear facing venturi behind the motor.
The tank was a simple piece of bending and soldering. All done, except the bridle, and here I ran into another minor problem. I usually use a bit of string as a temporary bridle to check the balance of the car, but the plan, such as it is shows the brackets arranged for the smaller tyres of the RV motor. With the larger Jaguar sized ones, the string fouled the rear tyre, so a new and longer rear bracket had to be made. Now it was a simple job to bend a traditional wire bridle with the ends locked in by washers, 1940s style. Job done. The only decision yet to be made is whether to polish the body or paint it as was the original, well, having seen it in the part polished state, I rather like it like that, so that is how it will stay. The original ‘Busy’ was sold to Harry Howlett and became the basis for all the cast production Oliver cars, but then vanished.
A more detailed history of the Oliver marque was published on the website in 2017.
©copyrightOTW2019